Converting a 20L to a SumpThis is my latest DIY project. I spent last weekend converting a standard 20 gallon long AGA aquarium into a sump. So far, I've been very pleased with the results. The sump consists of 3 Compartments: Compartment #1 = Skimmer Compartment, Compartment #2 = Refugium, and Compartment #3 = Return Compartment.
 Materials
:
1. 20L aquarium (or whatever size glass aquarium you'd like to make a sump out of; however, the baffle dimensions will change if you use a different size aquarium)
2. PVC
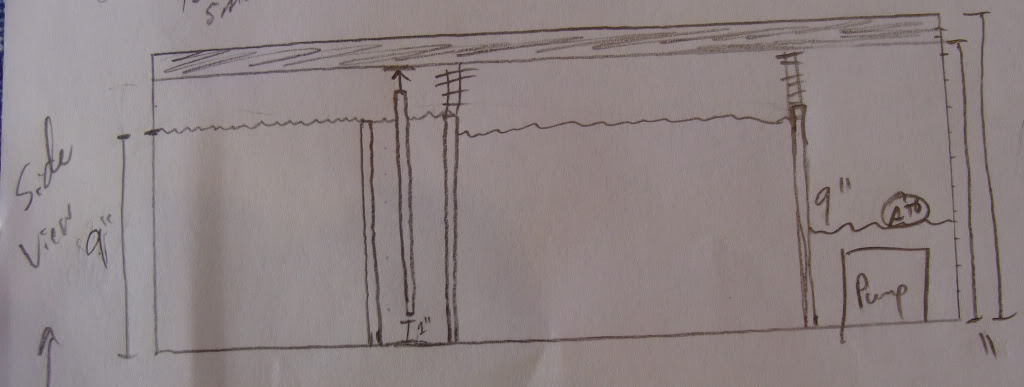
3. 3 glass baffles (.25" thick) with the dimensions of 11.75" x 9"
4. 1 glass baffle (.25" thick) with the dimensions of 11.75" x 10" (I got all of my glass cut at Borter Glass for $16. Great price, and great service! I was really impressed!!)

5. Aquarium-safe silicone
6. Super glue
7. Measuring tape
8. CD cases and/or other props to hold up baffles while drying
9. Eggcrate (cut to the dimensions of 11.75" x 2ish")
10. PVC cutters
11. Electrical tape
12. Scissors
12. Whatever you're putting in your sump (i.e. Skimmer, LR, LS, Macroalgae, Heater, Return Pump, etc.)
Blueprint Designs:

 Directions
:
1. Make sure the 20L is completely clean and dry.

2. Start with the first baffle. Use the measuring tape to position it in place, and then use a little super glue to glue it where you want it. Use cd cases or whatever props you've chosen to help hold up the baffle.
3. When the super glue is dry, silicone the baffle into place. Make sure that you do a thorough job. You don't want it to leak later...
4. Repeat Steps 2 and 3 for the other baffles.
*Side note: For the middle baffle of the bubble trap, 2-3 cd cases under the baffle work great to raise the baffle to approximately 1" off of the aquarium bottom. After you super glue and silicone the baffle into place and it dries, you can just slip the cd cases out.


*Another side note: Go SLOW! The key is patience. I tried to rush the project and was impatient waiting for the baffles to dry. It just costed me more time and aggravation in the end...
5. After all of the silicone has dried, super glue the eggcrate to the top of Baffle #3 and Baffle #4. (The eggcrate will help keep macroalgae and snails in the refugium compartment)
6. Run a leak test. Fill the sump with freshwater (less messy) starting with Compartment #1. Watch to see if the water leaks into Compartment #2. Repeat this process for all of the compartments.
7. Siphon out the freshwater.
8. If there was no leak, you're good to go. If there was a leak, let the sump dry (COMPLETELY!), and then re-silicone where the leak(s) occurred.
9. Next, plumb the PVC how you want it (single overflow, dual overflow, etc.).
10. Use electrical tape to seal the PVC joints. Some people use PVC glue, but IMO, you don't need to glue them. If you insert the PVC properly, it shouldn't leak. The electrical tape is just to strengthen the connections and as a precaution in case a little leak does occur.
11. Design your compartments how you'd like (i.e. Add your skimmer, your LR, LS, and macroalgae to your fuge, your return pump, ATO, etc.).
12. Add saltwater, and you're done!
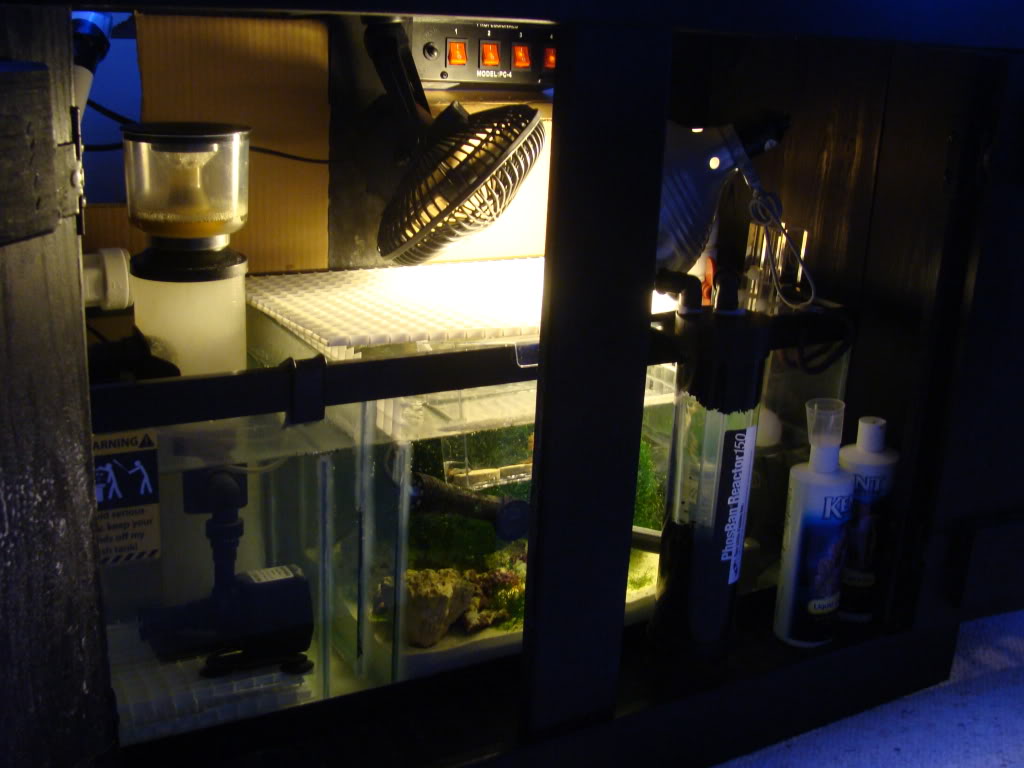
 The Finished Product
:


 Sun Jun 05, 2011 11:38 am